Using the Project Budgets Page
The Project Budget is your go-to tool for tracking and managing materials for a specific job, broken down into Work Areas and sections. It gives both office staff and field crews a clear picture of what's already been ordered, what still needs to be ordered, what's arriving, and how the job is tracking on days and hours. It's built to work on a phone, so a crew lead can run the job from the truck.
Getting to a Project Budget
You can open a Project Budget from a few places, so you're never more than a click away:
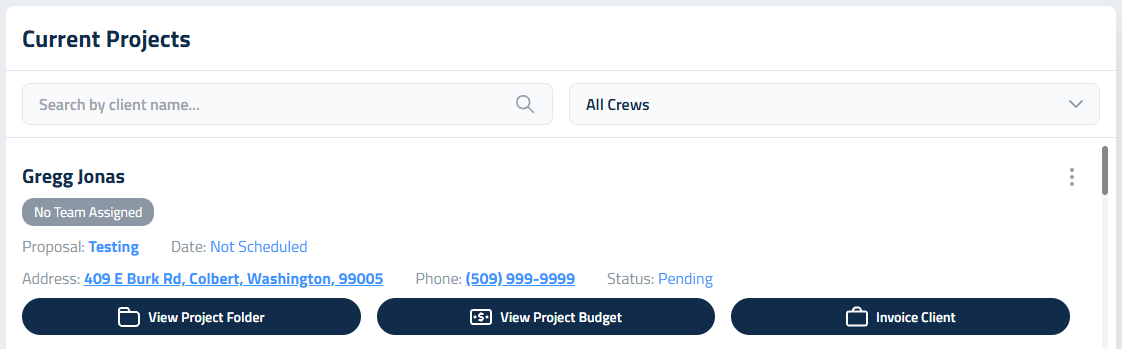
- Projects page: click View Project Budget on any project card.
- Project Folders: click Project Budget at the top of the folder.
- Smart Calendar: click a project on the calendar, then click View Project Budget in the project overview.
Running a lot of jobs at once? On the Projects page, use the search bar to find a project by client name, or use the crew dropdown to show only the jobs assigned to one crew. Choose No Team Assigned to find the jobs that still need a crew.
The Project Card
The blue card at the top of the page shows the job at a glance:
- Client and project, with the job address and the client's phone number. Tap the address to open it in Google Maps, or tap the phone number to call.
- Days on Job: how many of the scheduled days have come and gone, next to the Budgeted Days, with a bar in between. If the job isn't on the calendar yet, you'll see Not scheduled yet and a Schedule it button.
- Man hours: the hours your crews have clocked to this job, against the hours that were sold. It fills in from Timesheets and updates about every five minutes.
- Materials: what's been recorded so far against the materials budget. Owners and office roles see dollars; Foreman/PM and Field see the percentage.
- Call sheet opens your Supplier Call Sheet (covered below), and Folders opens this project's files, so you can check a plan or a photo without losing your place.
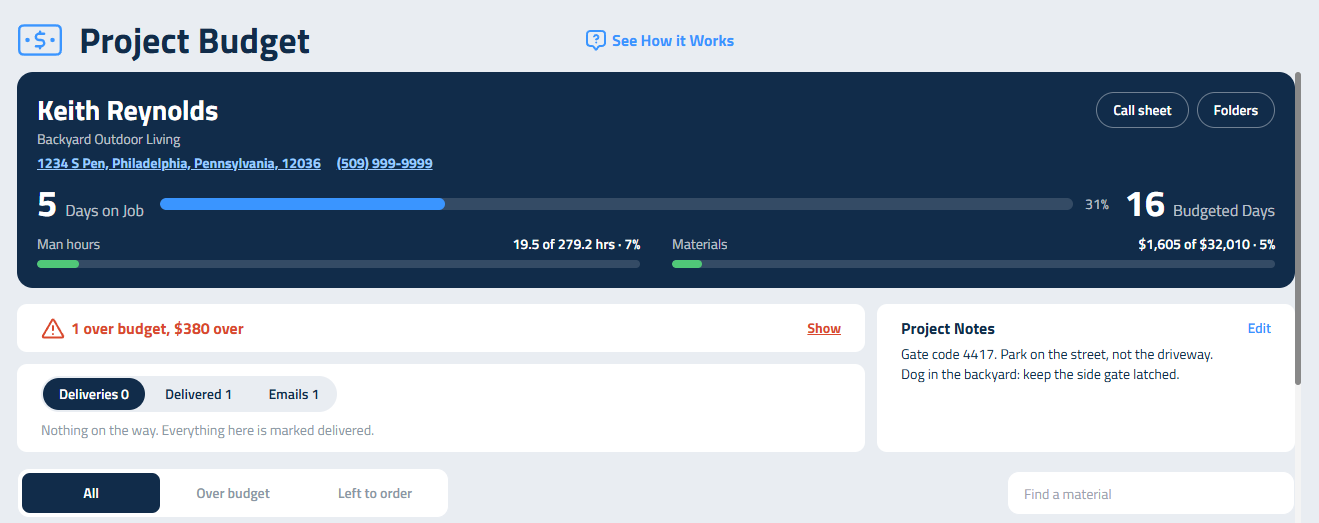
If anything on the job has gone over budget, a red line under the card tells you how many items, and for owners and office roles, how many dollars over. Click Show to list only those items.
Deliveries
Next to Project Notes, the Deliveries card shows what's on the way, so nobody has to dig through orders to know which truck is coming. It has three tabs:
- Deliveries lists the next seven days by day (Today, Tomorrow, then the date), one line per supplier with everything on that truck. A delivery that was due and hasn't been marked delivered shows under Not marked delivered, so it doesn't slip by.
- Delivered is where you check things off. Tick a supplier to mark the whole delivery, or tick single lines when only part of the order showed up. Untick to change it back.
- Emails lists every order email sent from the Call sheet for this project: when it went out, which supplier, the items, who it went to and who sent it.

Crew Notes
Crew Notes are designed to improve communication between the office and field teams. You can add Crew Notes during the proposal drafting phase to clarify expectations and provide context for each section of the job. Once the proposal is accepted it is locked. Crew Notes are then managed in the Project Budget page.
The Project Notes box near the top of the Project Budget page is designed for project-level instructions that help the crew navigate job-specific logistics. Click Add (or Edit) to write them, and click away from the box to save. Long notes show the first few lines; click Show all to read the rest. These notes are ideal for sharing important context such as:
- Gate codes or access instructions
- Parking guidelines (e.g., "Please park all vehicles and equipment on the side of the house")
- Neighbor concerns (e.g., "Do not block the street, neighbors have complained")
- Safety reminders or site-specific cautions
Description of Services and Crew Notes
When you expand a section, two panels sit side by side at the top:
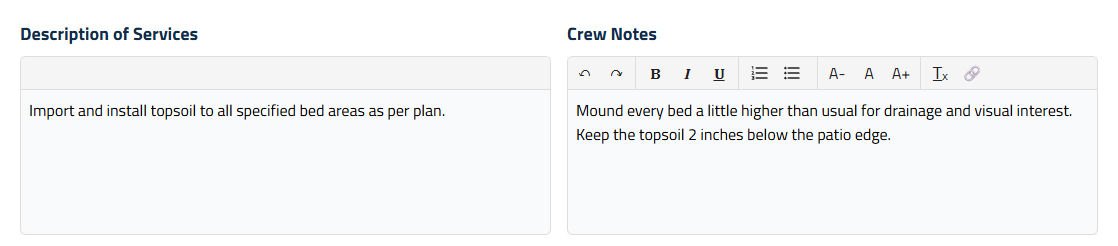
- Description of Services (left) shows the scope of work for that section, exactly as it was written in the proposal. It's read-only here, so what your crew sees always matches what the client signed. If the section has no description, you'll see "No description added."
- Crew Notes (right) is where the office tells the field what the job really needs: not just the daily to-do list, but the overall vision and the client's expectations. For example:
Please ensure all planting beds receive larger than average mounding to create enhanced visual interest and improved drainage throughout the landscape. Additionally, confirm that all mulch is applied at a consistent 3-inch depth, keeping it pulled back from plant stems and tree trunks to prevent moisture issues.
Updating Crew Notes After a Proposal Is Accepted
Once a proposal is accepted, it locks on purpose. The signed scope and price are a record, so you and your crew are always working from the same agreement. You can't unlock the proposal to edit it directly, but you can keep your Crew Notes up to date right here in the Project Budget.
To update Crew Notes:
- Open the Project Budget for the job.
- Expand the section you want to update.
- Click into the Crew Notes panel on the right and make your changes. Any Crew Notes you added while drafting the proposal carry over, so you pick up right where you left off.
- Click away from the box. Your changes save automatically, and you'll see "Note updated with success."
The Description of Services stays locked as part of the signed proposal. That way you can add detail and direction for your crew without changing what the client agreed to.
Working with Sections
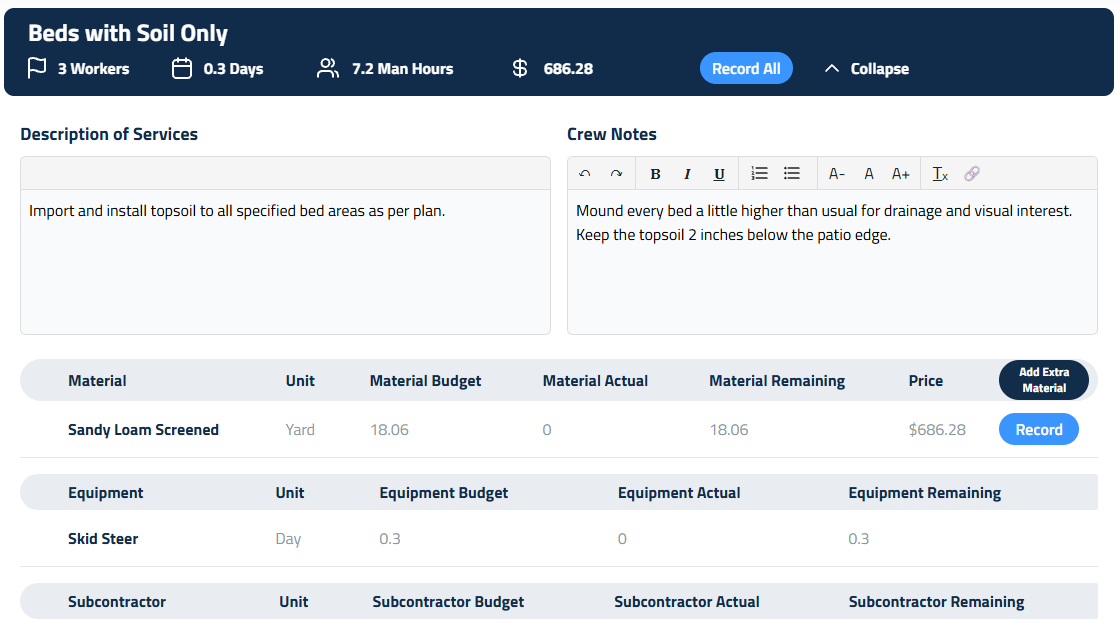
Below that is a list of project Sections, organized by Landscape Work Area. Each Section sits under a blue bar that displays:
- Crew size assigned
- Allotted days
- Total man-hours
- The section's price (owners and office roles only)
Small tags on the bar flag a section that has something over budget or a delivery coming. Click Expand (or anywhere on the bar) to open the section and show all assigned materials, including:
- Units of measurement
- Budgeted quantities
- What's been ordered so far
- What's still needed
A warning sign marks anything that's gone over budget, and materials added after the proposal are tagged Unplanned. Equipment and subcontractors get their own tables under the materials.
Showing What Matters
On a big job, use the switch above the work areas to narrow the list:
- All shows every section.
- Over budget shows only the items that have gone over.
- Left to order shows only the materials that still need ordering.
On a Phone
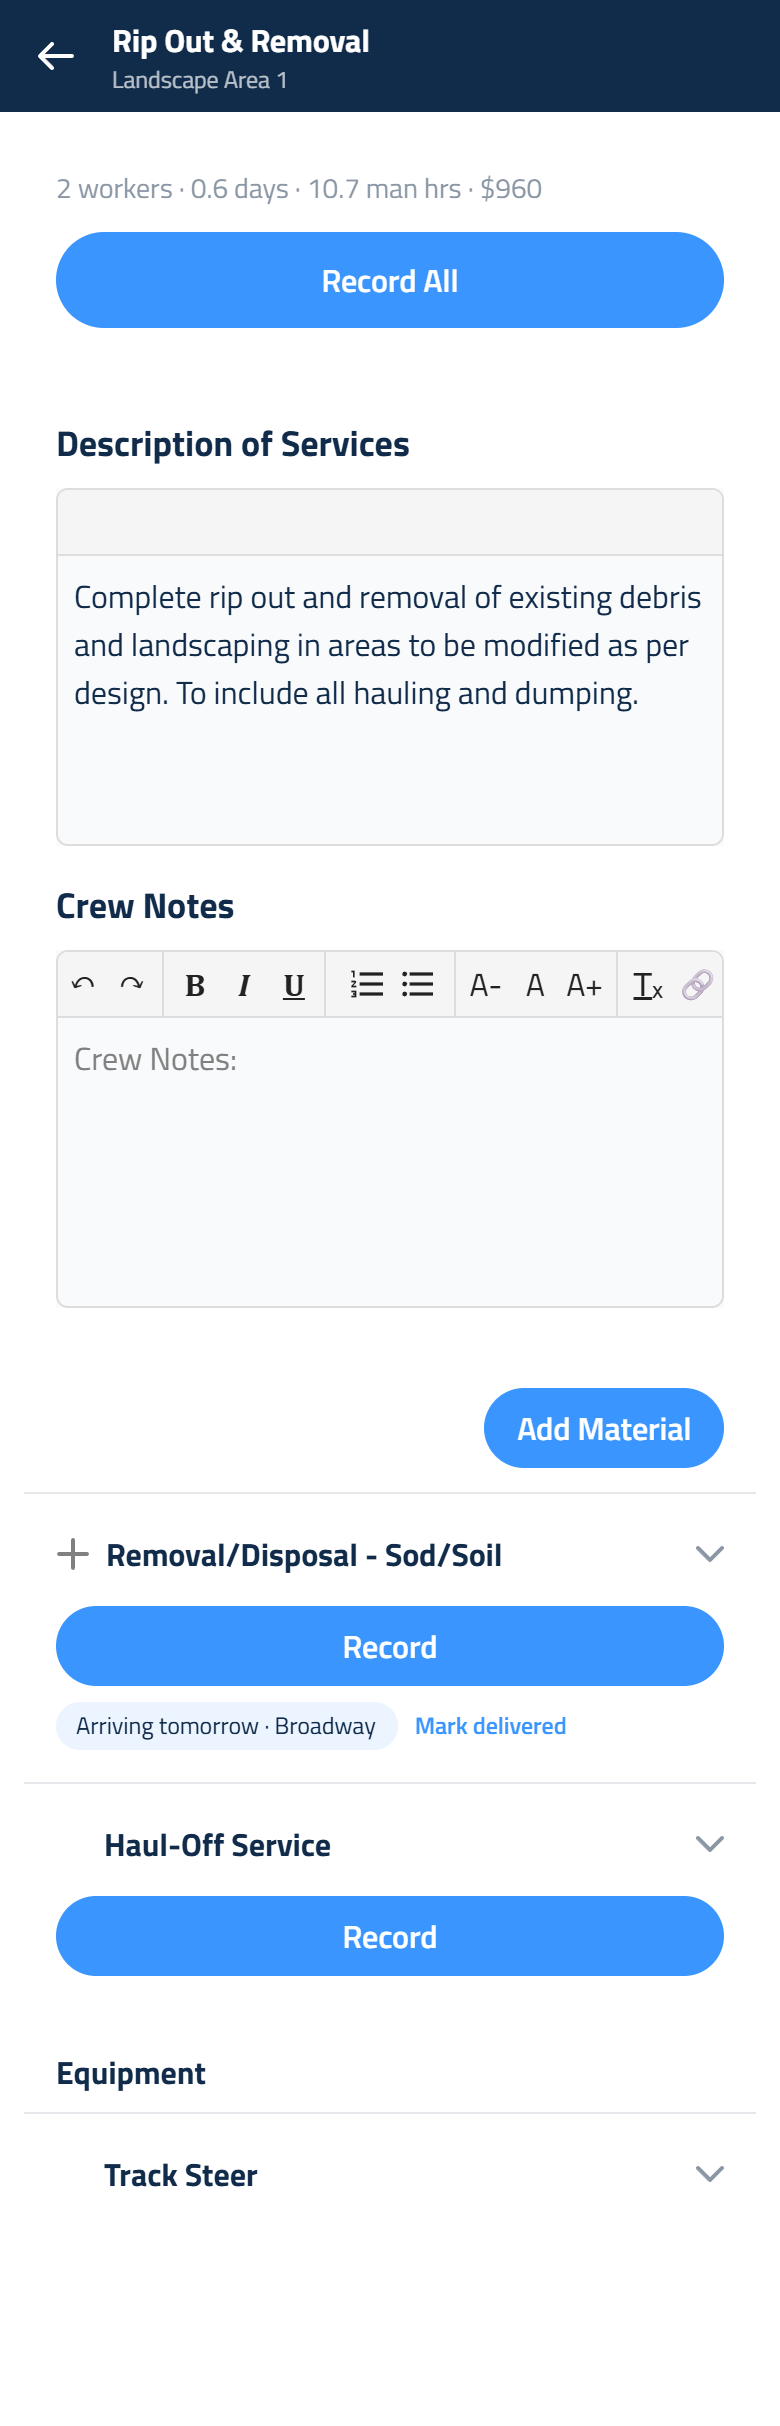
Tap a section to open it on its own screen. Record All sits at the top, then the Description of Services and Crew Notes, then the materials. Tap a material's name to see its budget, what's been ordered, what's left and its orders, and use the Record button under it.
Adding a Material to a Section
Jobs change once you're on site. If a section needs a material that wasn't in the proposal, you can add it right from the budget:
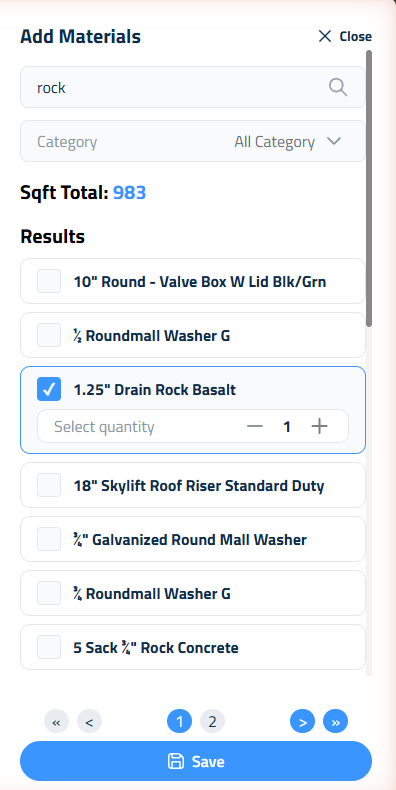
- Expand the section and click Add Extra Material in the material table header. On a phone, tap Add Material at the top of the section's list.
- The Add Materials sidebar opens with your catalog. Search by name, or narrow the list by Category, Sub Category, and Group.
- Check the materials you need and set a quantity for each one.
- Click Save.
The new material shows up in that section's material list, tagged Unplanned, and you can order it with Record like anything else. Your vendor from the catalog comes along with it.

Subcontractors
If a section includes subcontracted work, a Subcontractor table appears under the materials. It shows each subcontractor's unit, budget, actual, and remaining amounts, so you can keep an eye on subcontracted work alongside your materials.
Ordering Materials
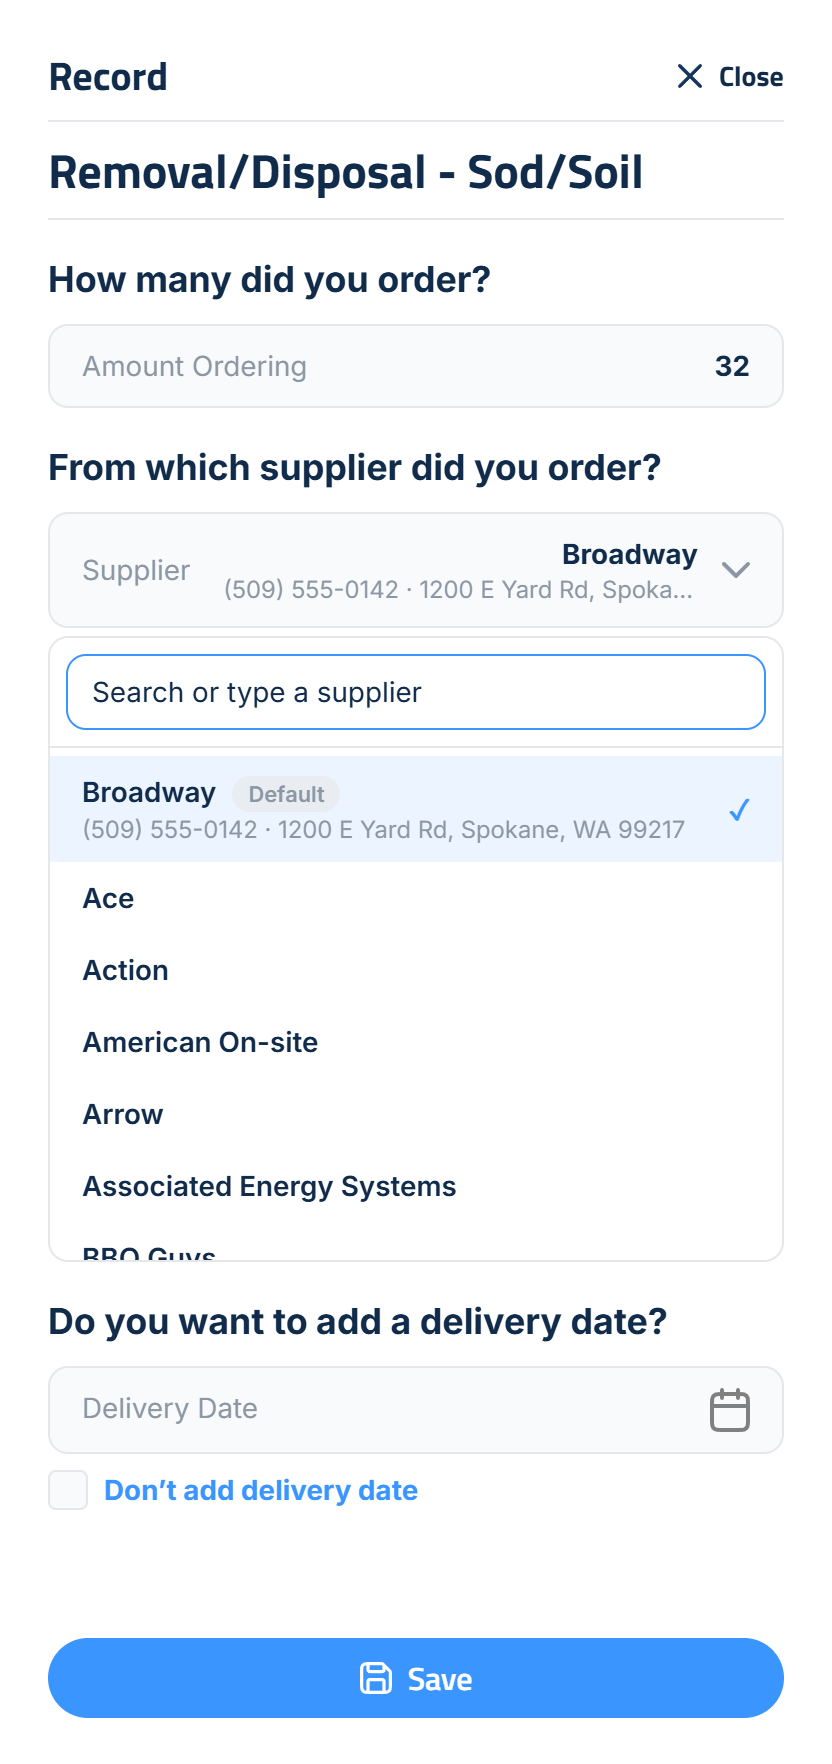
To add to your Supplier Call Sheet, click the Record button next to the material you need. A sidebar opens with three questions:
- How many did you order? The amount starts at what's left to order for that section. Change it if you're splitting the order into more than one delivery.
- From which preferred supplier did you order? Pick from the suppliers on that material in your Catalog.
- Do you want to add a delivery date? Pick a date from the calendar, or check Don't add delivery date.
Click Save. A message at the bottom of the screen confirms what was recorded, with Undo in case you got it wrong.
Every order is logged. When a material has orders, a plus sign appears next to it. Click the row to open its order history, which shows:
- Who placed each order
- The order date and the delivery date
- The supplier
- How much was ordered
From there you can mark an order Delivered, or delete it with the trash can. Deleting shows an Undo too, so a slip of the thumb is easy to fix.
Ordering Multiple Items
To order several materials for a section at once, click Record All on the section's bar. Check Select All Materials, or check just the ones you want. As you check each one, the amount fills in with what's left to order. The first supplier and delivery date you pick are copied to the other checked materials for convenience, but you can adjust each one as needed. Click Save, and Undo is there if you need it.
Repeat this process as often as necessary. Every order is tracked automatically.
Ordering One Material Across Sections
On a bigger job (more than three sections), a Find a material box appears above the work areas. Type a material name, like "soil" or "basalt", and the page switches to a list of every section that uses it, grouped by material, with a Total row for each one and an All materials total at the bottom. Owners and office roles also see prices.
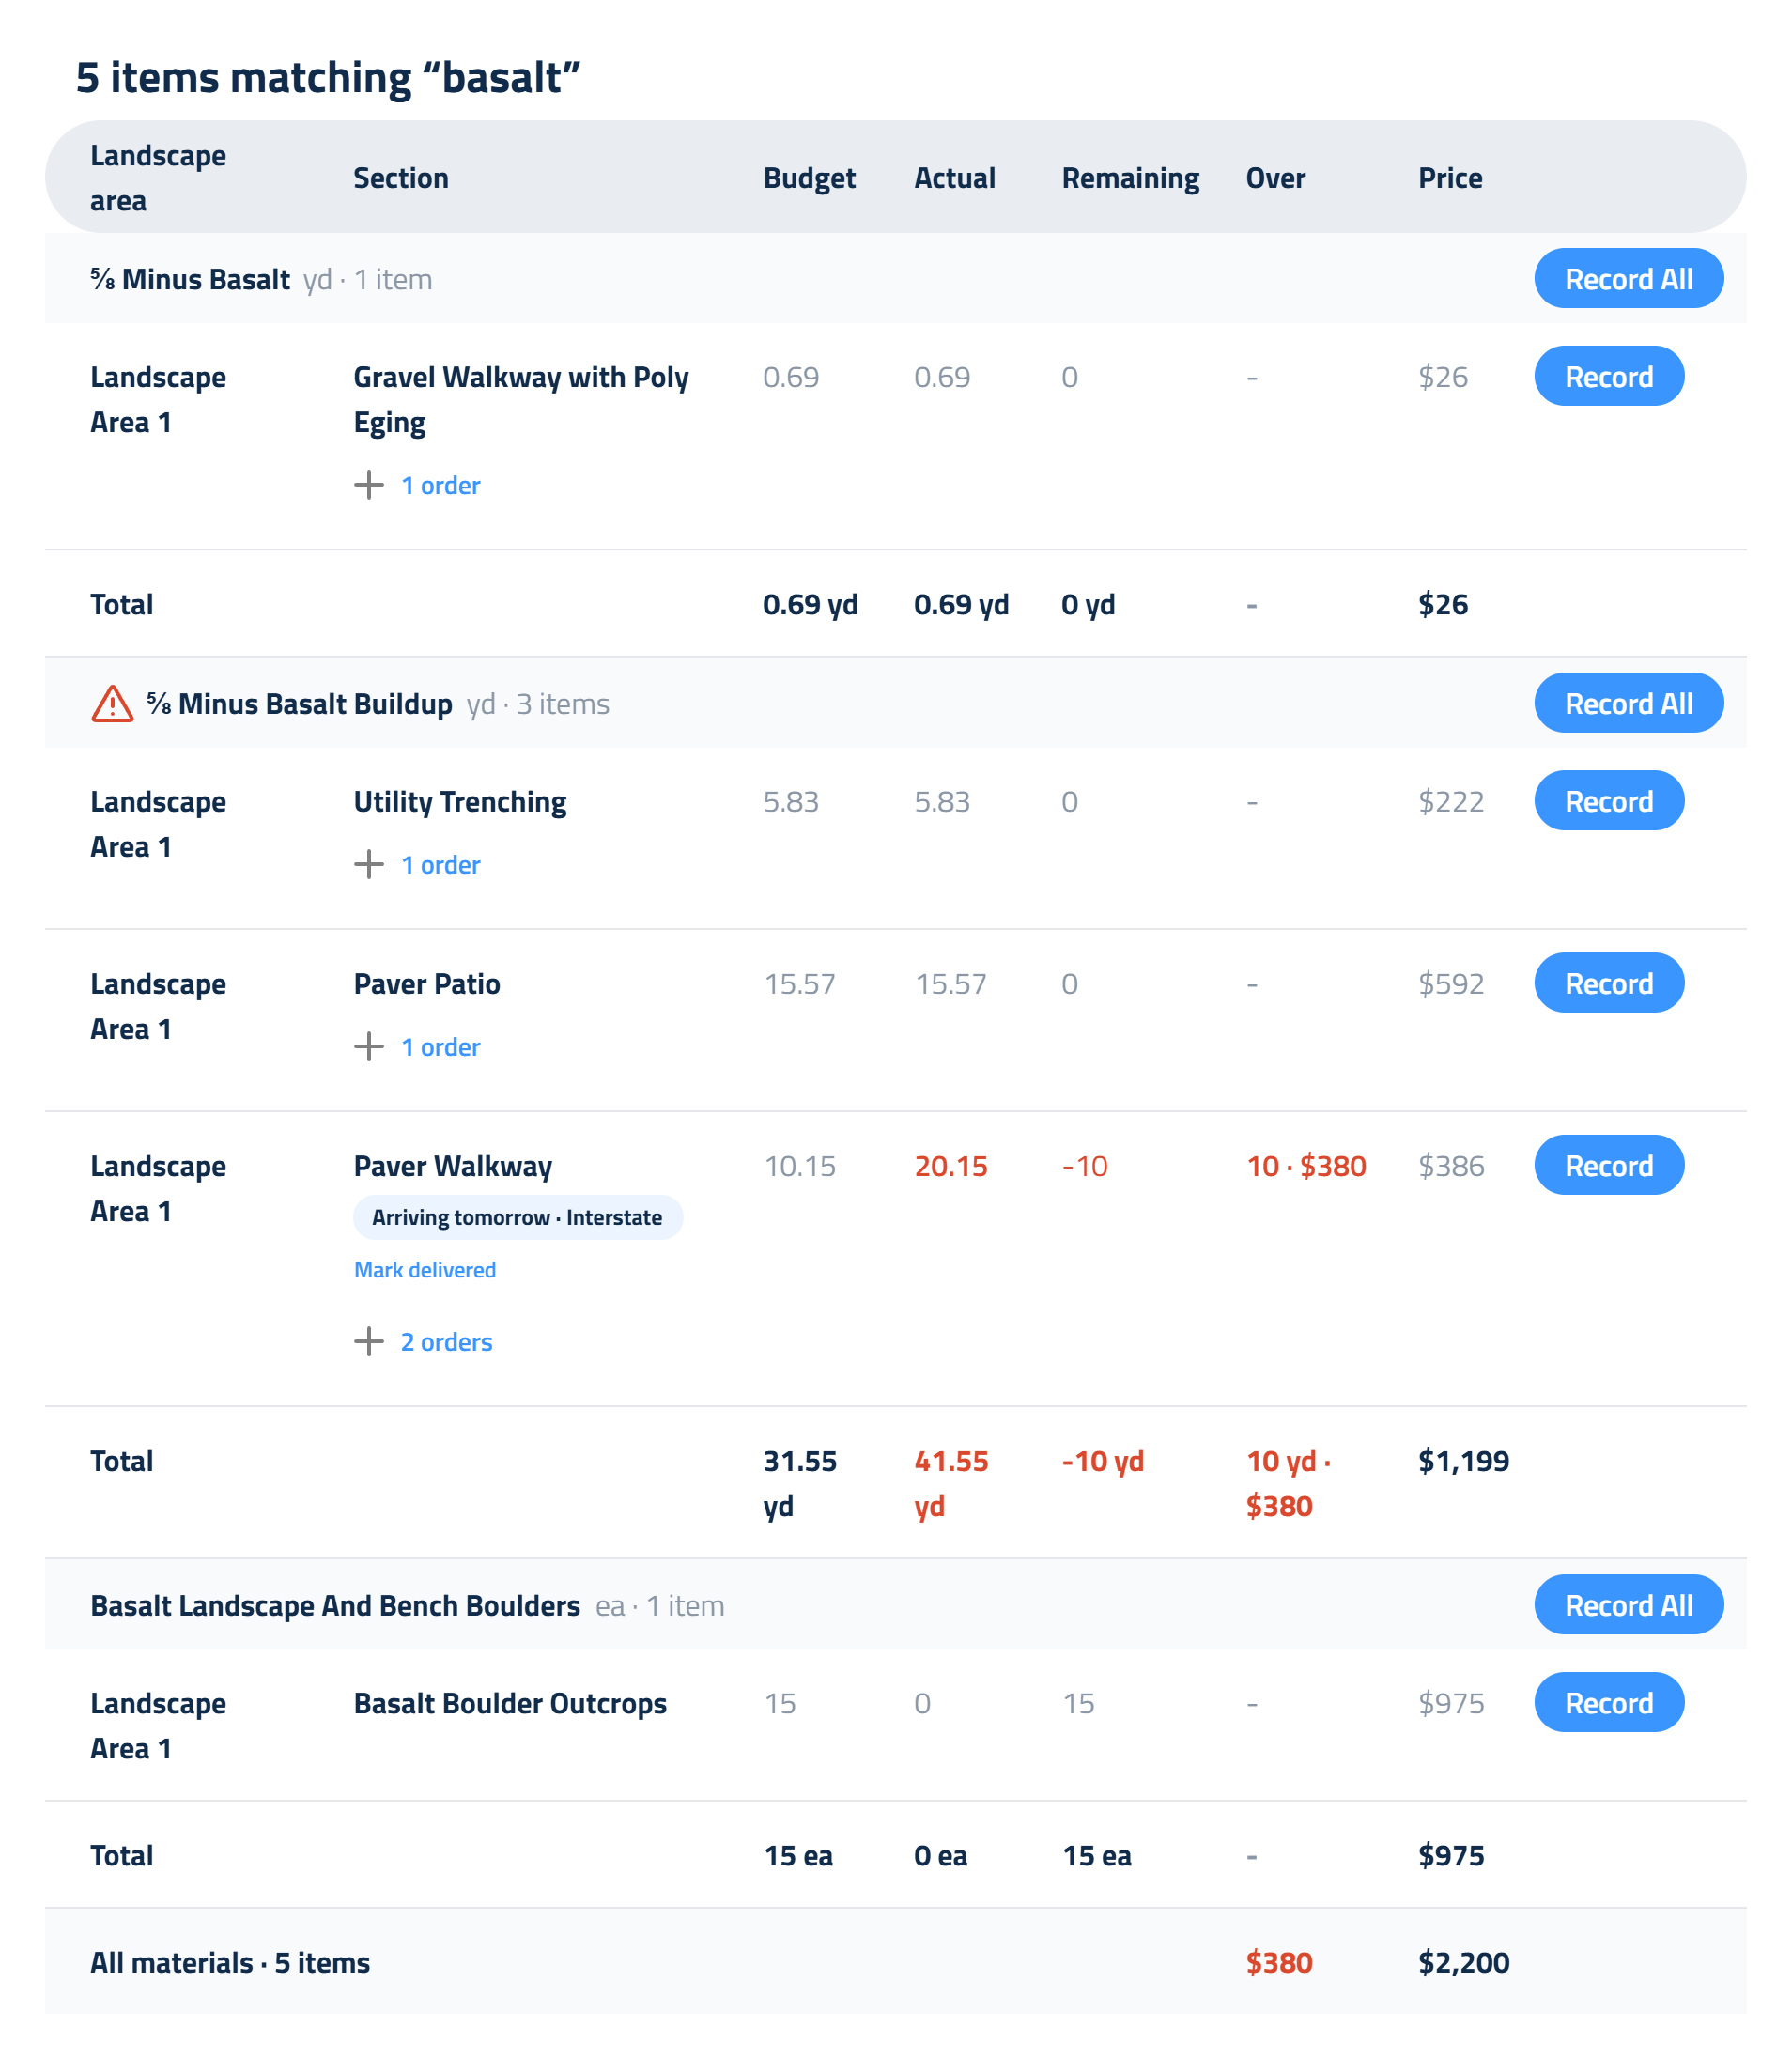
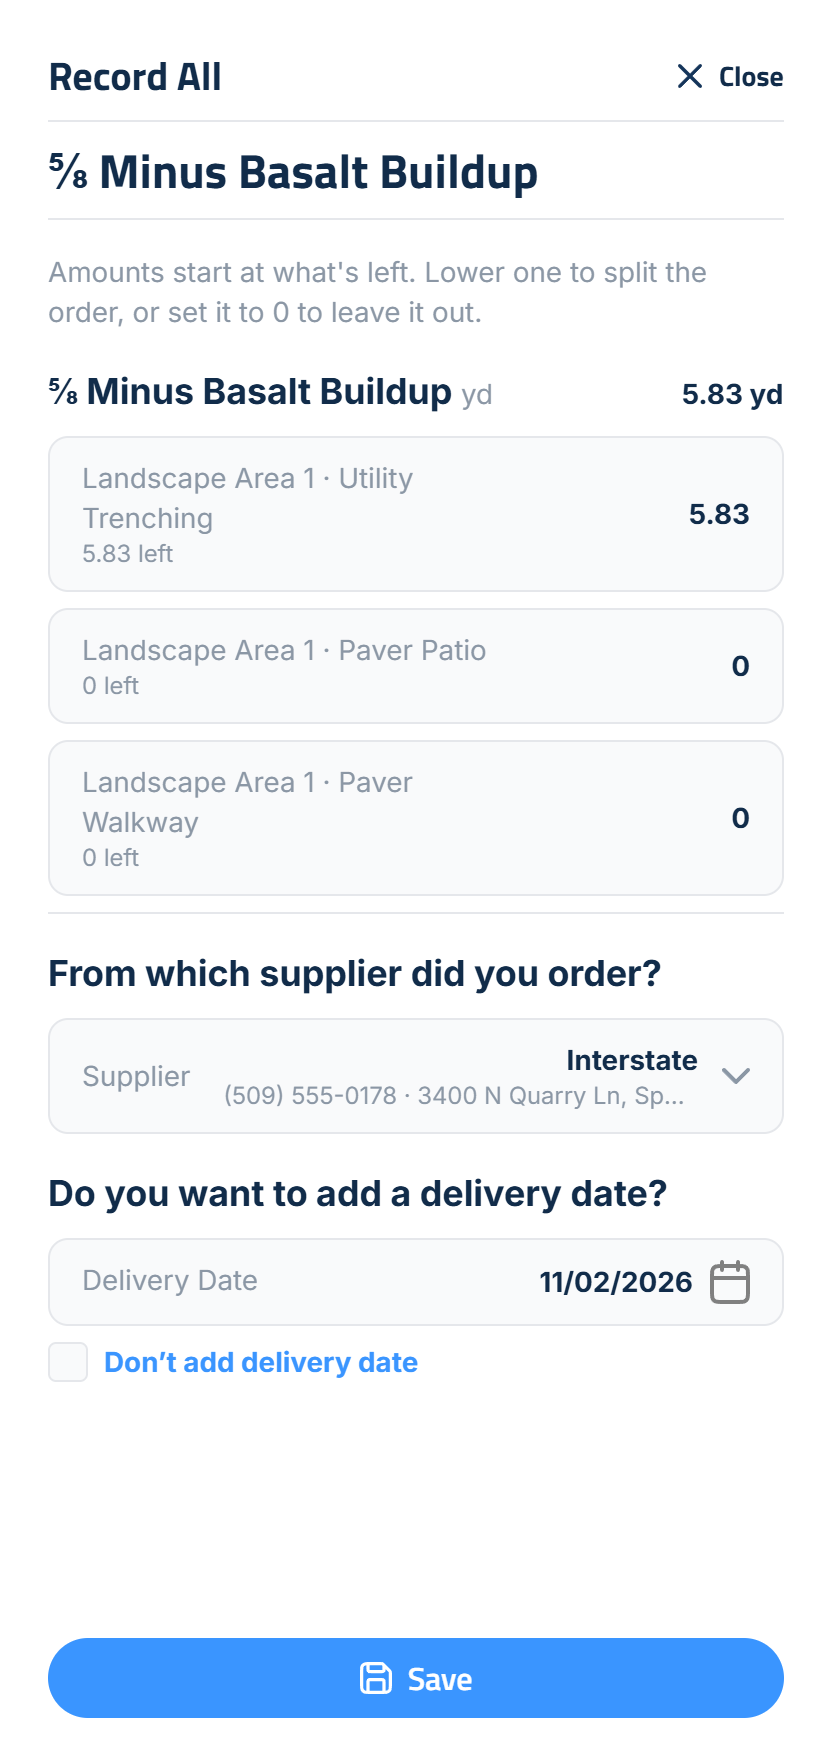
This is the fastest way to order a material for the whole job in one go. Click Record All next to the material:
- Each section's amount starts at what's left to order there.
- Lower an amount to split the order, or set it to 0 to leave that section out.
- Pick one supplier and one delivery date for the lot, then click Save.
Each section gets its own order, so the budget stays accurate section by section, and the Supplier Call Sheet combines them into one line per material, supplier and delivery date.
Supplier Call Sheet
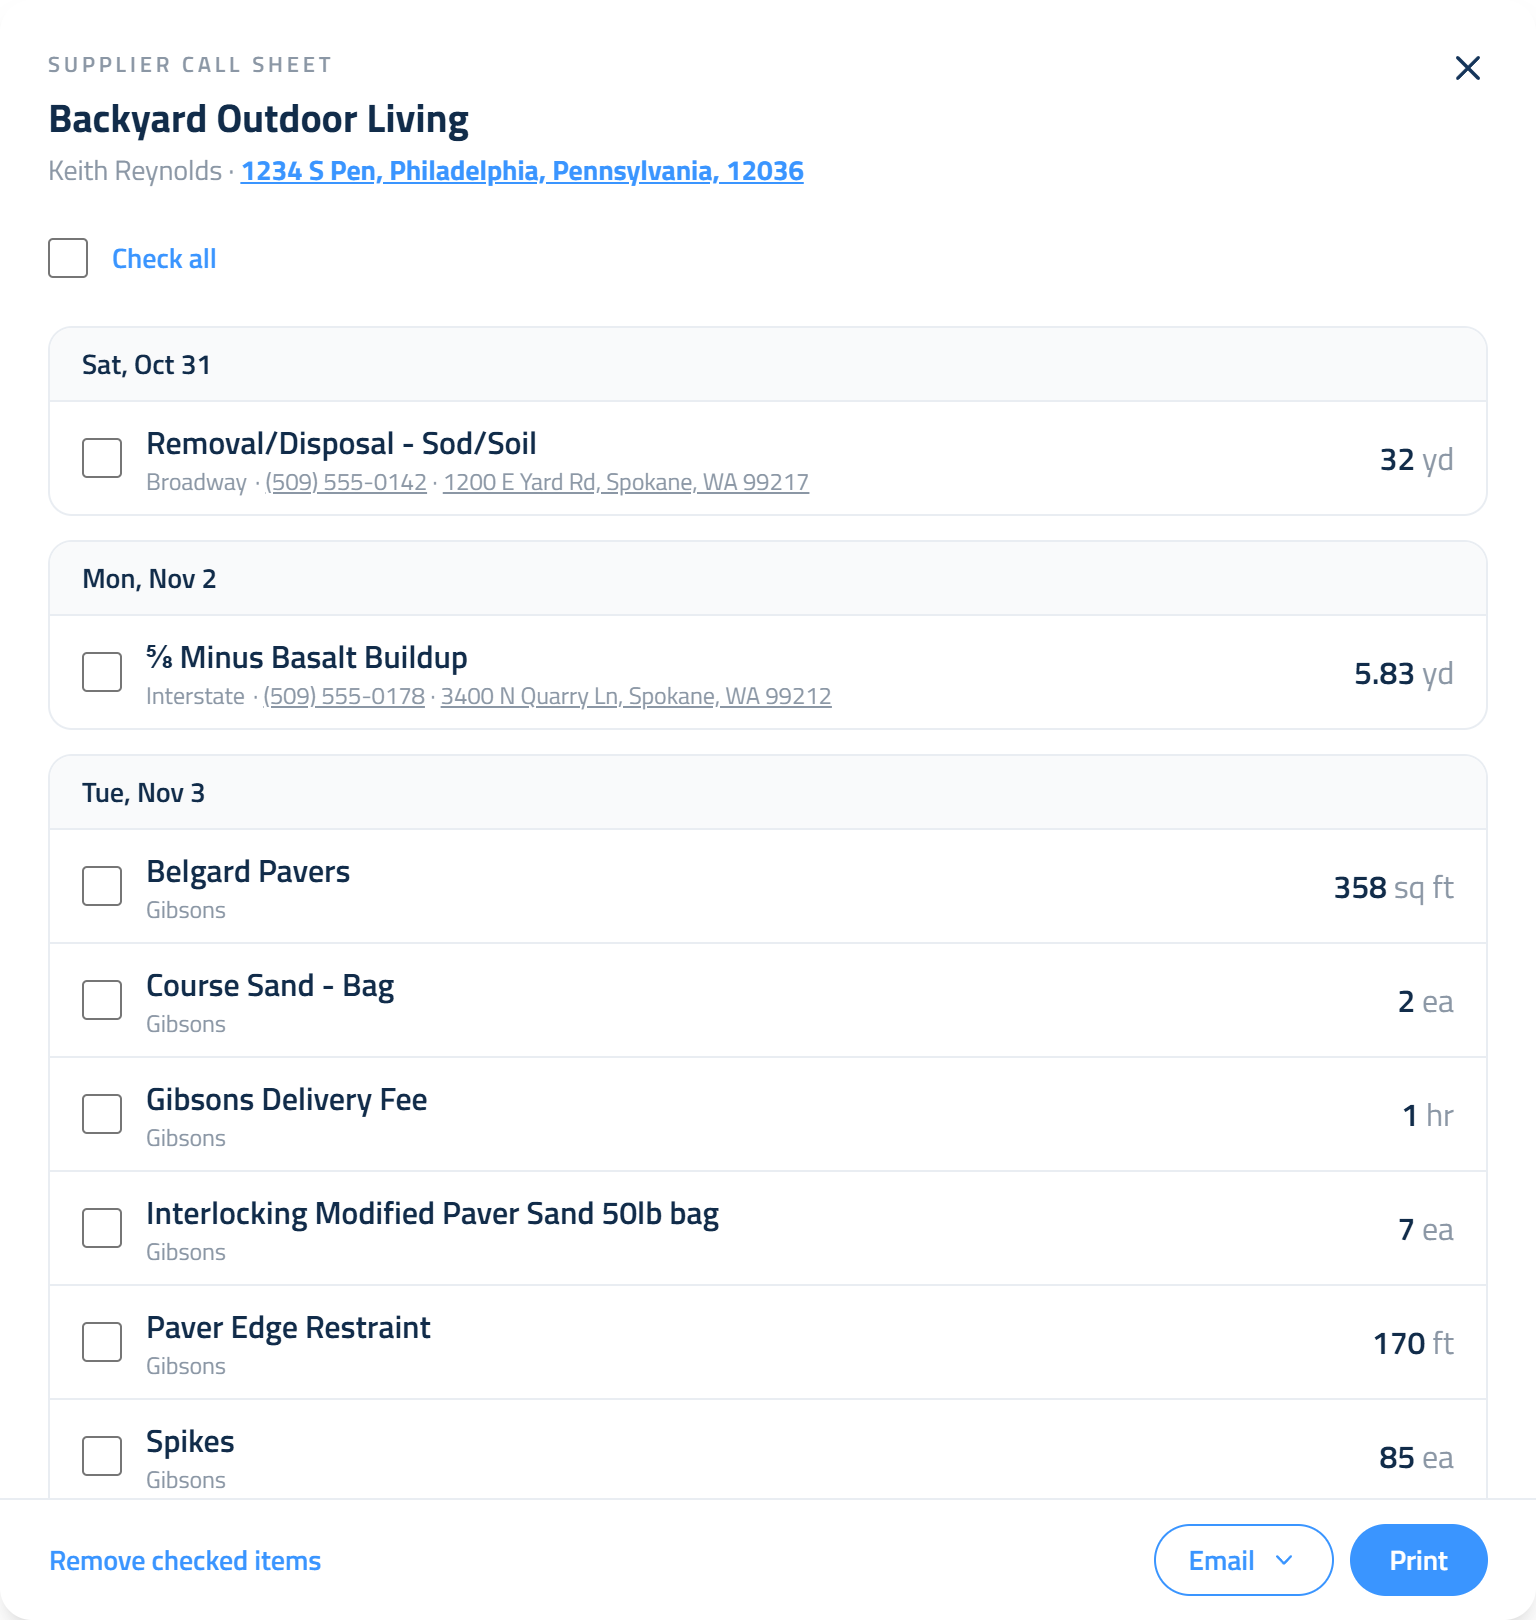
The Supplier Call Sheet provides a centralized view of all materials that have been marked for ordering using the Record or Record All buttons. Click Call sheet on the project card to open it.
Orders are grouped by delivery date, with upcoming deliveries first. Past dates are under Earlier deliveries, and anything without a date is under No delivery date. Each row shows the material, the supplier, and the total amount for that date, so two orders of the same material from the same supplier on the same day show up as one line.
This report helps you track all pending and completed material orders across your project, making it easier to coordinate deliveries and ensure nothing is missed.
Use the check boxes to mark off what you've handled, or Check all to check every row at once. Keep in mind, checking items off your list does not order them. On its own, the Supplier Call Sheet is for recordkeeping only. Remove checked items clears the rows you've handled off the sheet, and Show removed items brings them back.
You can also click Print to print the call sheet exactly as it appears on screen.
Emailing an Order to Your Supplier
When you're ready to actually place the order, click the Email button on the Supplier Call Sheet. Elevation Advisor sends the order for you, so there's no copying material lists into your email app and no phone tag with the yard.
A list of your suppliers opens under Send to a supplier. Each one shows how many items on the call sheet belong to them, so you can see at a glance who you still owe an order. A supplier with nothing left to order is greyed out.
Click a supplier and the send window opens. Elevation Advisor prefills the address you used the last time you emailed that supplier, so a repeat order is usually one click and Send.
- More than one recipient: type additional addresses separated by commas or semicolons. You can send to up to 10 addresses on a single order, which is handy when you want the yard's dispatcher and your own office copied.
- Replies come back to you: the email goes out under your business name, and both the reply address and a copy are set to your own inbox. You get a record of the order in your email, and when the supplier writes back it lands with you, not in a no-reply void.
Click Send and the order is on its way.
What Your Supplier Receives
The subject line is your company name followed by "Material Order," so it's recognizable in a busy inbox.
The email opens with a greeting to the supplier by name, then a short header block so they can scan the job at a glance:
- Client
- Project
- Job Site (the full project address)
- Delivery Date (shown here when everything on the order lands on the same day)
Below that is the material list. Items are grouped by delivery date with the soonest date first, and anything that doesn't have a date set yet comes last under its own heading. Each line shows the material, the amount, and the unit in clean, lined-up columns.
The email closes with your name, your business name, and your phone number. If you don't have a personal phone number on your Elevation Advisor account, your business phone number is used instead.
Tracking What You've Already Sent
Every order email is recorded, so nothing goes out twice by accident and nobody has to ask "did anyone call the rock yard?"
- Sent appears next to any supplier you've already emailed for this project.
- Underneath is a line showing when the last order went out and who it went to, for example "Sent Aug 12, 3:40 PM."
- Click that line to expand the full history for that supplier. You'll see every send, with the exact items and amounts that were in each one.
Suppliers keep their history even after their items clear off the call sheet, so the record stays with the project. The Emails tab in the Deliveries card shows the same history without opening the call sheet.
Back on the call sheet itself, any row that has gone out in an email is tagged with a green Emailed badge. That gives you a quick read on which lines are handled and which are still waiting on someone.
Who Sees What
- Owners, admins, managers, estimators, sales, and accounting see everything on the page, including prices and dollar amounts.
- Foreman/PM sees hours, quantities, and percentages, but no prices or dollar amounts, and can record orders, mark deliveries, add materials, and update notes.
- Field sees the same view as Foreman/PM. Recording orders, marking deliveries, adding materials, and editing notes need a Foreman/PM or office login.
Updated on: 10/30/2026
Thank you!