Beds: Begin here if you are just getting started with Sections
This guide introduces you to working with Sections in Elevation Advisor, using the Beds section as a detailed example. While we’ll focus on creating and managing beds within a proposal, the steps and best practices outlined here apply broadly to all landscape sections. By the end, you’ll have a solid understanding of how to measure, structure, and populate any section with confidence.
To illustrate the process, we’ll use a real-world example from a landscape designed by our co-founder’s company.
Elevation Advisor Sample Design
This design is divided into two distinct areas:
- The first area, outlined in blue, represents what the client originally requested. In the proposal, we refer to everything within this blue boundary as the Patio Area.
- The second area, outlined in red, is called the Garden Area. This portion is presented in the proposal as optional additional work the client may choose to include.
Focusing on the Patio Area, you'll notice a patio, planting beds, various plants, and a walkway. Each of these individual components is treated as a Section in Elevation Advisor.
Measuring Beds in the Patio Area
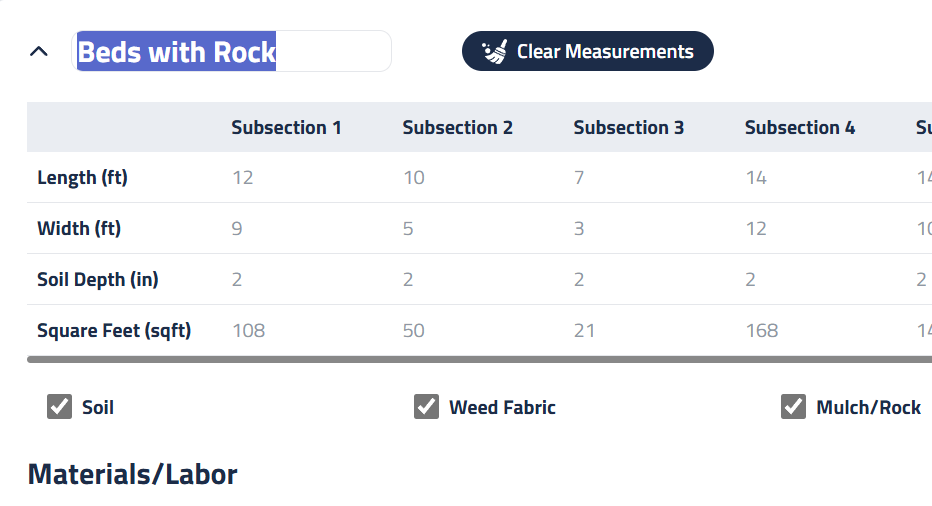
Let’s begin by measuring the beds within the blue-outlined Patio Area. Start with the bed in the lower-left corner of the design. It’s wider near the house and narrows as it approaches the lawn.
If you already know the square footage, open the Beds section, double-click on Square Feet under Subsection 1, and enter the value directly.
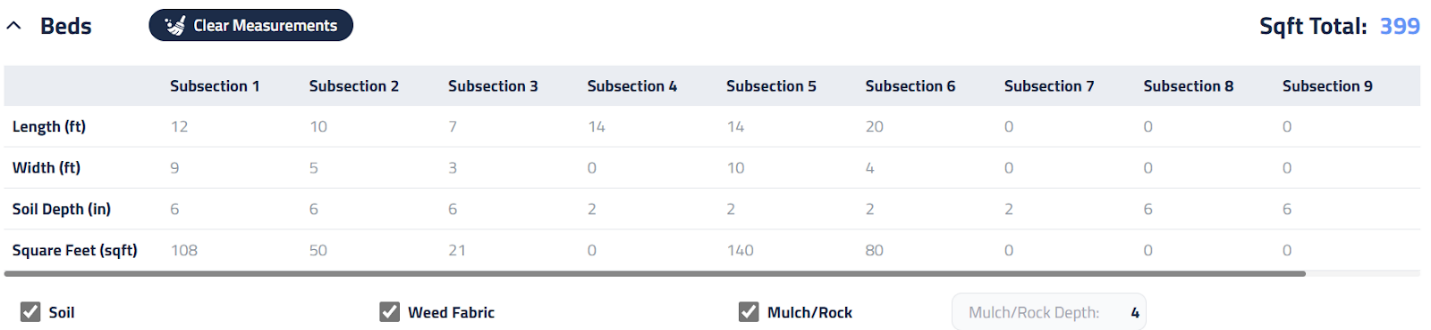
If you need to measure manually: Break the bed into smaller, manageable shapes and use a separate subsection for each:
- Subsection 1: Largest part near the house — 15’ x 9’
- Subsection 2: Middle portion where the patio curves — 10’ x 6’
- Subsection 3: Narrow top section near the lawn — 7’ x 3’
Continue measuring all beds in the Patio Area using this method. New subsections will be added automatically as you fill in the last column. If needed, you can double-click on any subsection header to rename it.
Below the measurements grid, you’ll find checkboxes for Soil, Weed Fabric, and Rock/Mulch. In our example, we’re using 6” of Soil along with Weed Fabric and Rock for mulch, so all three items should remain selected. Lastly, enter the mulch depth in inches so the system can calculate the quantity needed. The default is 4”.
Materials/Labor
This section is where you configure products and estimate labor. The Beds template includes three predefined line items: Soil, Weed Fabric, and Mulch/Rock. Quantities are automatically calculated based on your measurements, you just need to select the material you’ll be using.
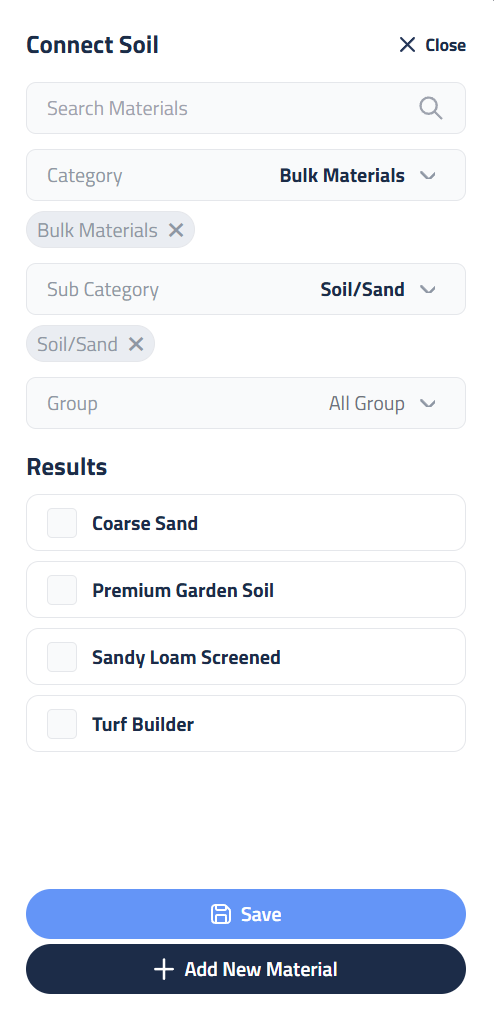
To add the type of soil:
- Click Connect Item from the Soil line.
- The materials sidebar opens.
- If you know the name of the material, type it in the Search Materials box.
- To browse, select the Bulk Materials category, then the Soil/Sand subcategory. You can also filter further by Group if needed.
- Select the soil product from your catalog and press Save.
You’ll now see the selected product on the Soil line, along with its Quantity, Unit Cost, and Total Cost. If you previously entered install time per yard in your catalog, the system will show how many crew hours it will take to install the material. If not, double-click on Crew Hours and enter the time manually.

In this scenario, a crew of two takes about 45 minutes to install 5 yards of soil. Enter 0.75 and hit Enter. A popup will ask if you want to update the catalog with the new minutes:
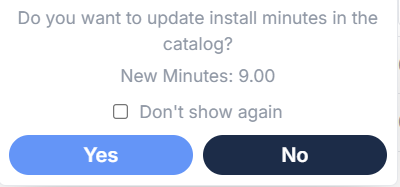
- No: Saves the crew hours to this proposal only.
- Yes: Adds the calculated minutes per yard (9 minutes) to your catalog for future use.
The next time you add the same soil to a proposal, it will multiply your quantity of soil by 9 minutes to automatically calculate your labor hours!
Repeat the same steps for Weed Fabric and Mulch/Rock. To add additional materials, click the +Add Material button to open the sidebar.
Editing Materials
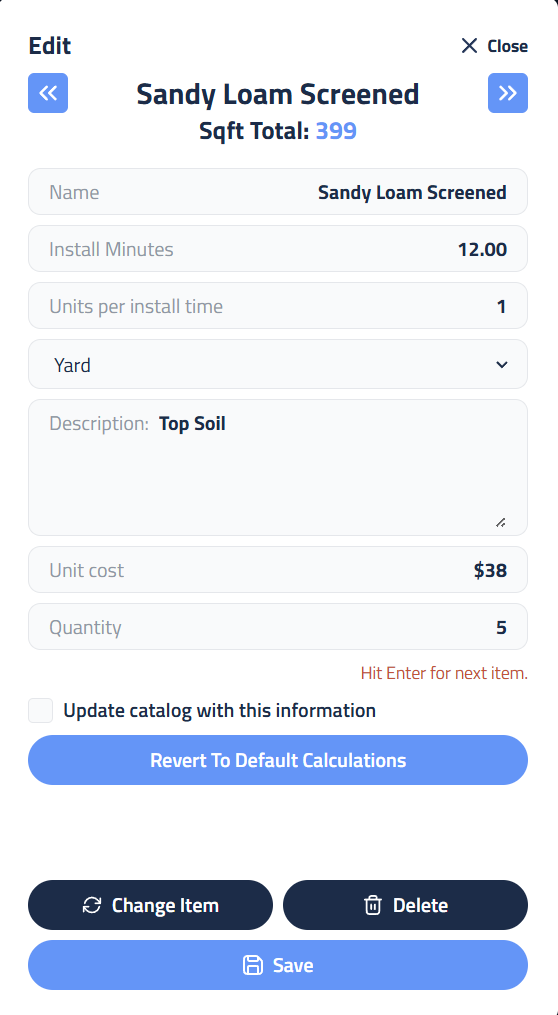
To make changes to a material, click the blue edit button next to the product name. This opens the Edit sidebar, where you can adjust:
- Install Minutes, Unit Cost, Quantity, or add a Description
- Example: If soil must be staged 300 yards away, and each round trip takes 30 seconds, three trips per yard adds 3 minutes. Add this to Install Minutes.
You can also:
- Check “Update catalog with this information” to save changes for future proposals.
- Click “Revert to Default Calculations” to undo manual quantity changes.
- Click “Change Item” to select a different material.
- Click “Delete” to remove the line item.
- Press Save when finished.
Labor Summary. Equipment and Subcontractor Setup

The Labor Summary section helps you estimate workforce needs and project duration. It includes four key metrics:
- Crew Size: This field is fully editable by double-clicking. While most sections use the default crew size set at the top of the proposal, you can adjust it for specific tasks. For example, installing heavy materials like 2" rock may require increasing your crew from two to three members to improve safety and efficiency.
- Crew Hours: This represents the total working hours needed to complete the section, regardless of how many crew members are assigned.
- Total Man Hours: This is the combined labor time across all crew members and is essential for budgeting and payroll planning.
- Installation Days: This value is calculated by dividing Crew Hours by your daily billable hours. It helps determine the project timeline and supports scheduling and client communication.
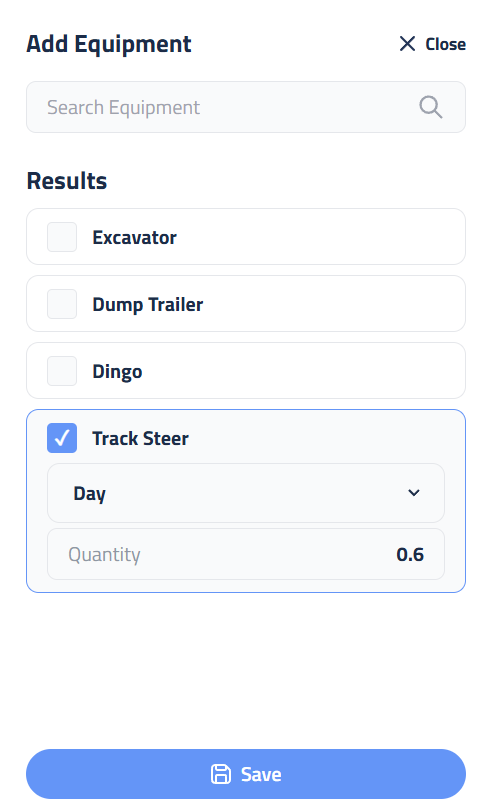
To include equipment in your Beds section:
- Click the + Add Equipment button.
- Choose the appropriate equipment type from the menu.
Billing options:
- By default, equipment is billed daily, and the quantity will automatically match the number of installation days.
- To bill hourly instead, select "Hour" from the dropdown and manually adjust the quantity.
Once your equipment settings are configured, click Save to apply the changes.
Subcontractors
To include a subcontractor:
- Click + Add Subcontractor.
- Select the subcontractor you’re using.
- Fill in the unit, quantity, and cost.
- Click Save to finalize.
Description of Services and Crew Notes
The last two items to fill out are the Description of Services and Crew Notes fields.

Description of Services
This field is where you communicate the scope of work to your client. It appears in the final proposal and should be written in clear, professional language that helps the client understand exactly what they’re purchasing. To organize your description for easy comprehension, you can utilize bullet points, numbered lists, different fonts and font sizes, and most standard text tools in our toolbar.
Use this space to:
- Outline the work being performed
- Highlight key features
- Reinforce the value of your services
To save time on future proposals:
- Click Save Note to store frequently used descriptions.
- Use Import Note to quickly load a saved description for similar projects.
If you want to provide a detailed breakdown of materials and quantities:
- Click Calculate Materials List to generate a transparent, itemized list that builds trust and confidence in your proposal.
Crew Notes
This field is for internal use only and is never visible to clients. It’s designed to communicate important project details to your field team, such as:
- Staging instructions
- Access notes
- Special considerations
Crew Notes appear on the Project Budget page, ensuring your crew has the information they need without cluttering the client-facing proposal. This separation keeps your communication clear, professional, and focused for both your team and your clients.
Offering Material Alternatives with ISPS
ISPS is a core principle of Elevation Advisor, designed to help you present clear, compelling options to your clients. One of the simplest ways to apply ISPS is by offering material alternatives within a proposal, for example, showing both rock and bark options for a bed installation.
To do this:
- Rename your original section to something specific, like "Beds with Rock". This naming convention helps both you and your client easily distinguish between choices.
- Scroll to the bottom of the section and click Duplicate Beds.
- When prompted, name the new section "Beds with Bark" and click Duplicate.
This creates an exact copy of the original section, including all measurements, labor, and equipment.
Updating the Material
Open the new Beds with Bark section. All original data will be preloaded.
To update the material:
- Click the blue Edit button next to the Mulch/Rock item.
- Select Change Item.
- Choose your preferred bark product from the material sidebar.
The system will automatically recalculate labor and pricing based on the new material.
Now you have two distinct sections:
- Beds with Rock
- Beds with Bark
Each includes accurate pricing, allowing your client to compare and choose confidently.
Saving for Future Use
To save time on future proposals:
- Click Save as Template to store the section, including materials, labor, equipment, and subcontractors, for easy reuse.
For more on creating and managing templates, refer to the Template documentation.
You made it! Thanks for sticking with us on this deep dive into working with Sections in Elevation Advisor.
Updated on: 02/17/2026
Thank you!