How to Use Smart Calendar
Smart Calendar is one of Elevation Advisor’s most powerful tools, built specifically for the real-world needs of landscape professionals. It simplifies project scheduling and crew management with a clean, color-coded interface that gives you instant visibility into who’s working where, and when.
This dynamic system adapts to your custom work week, accounts for holidays, and tracks all active jobs across your crews. Most importantly, it automatically adjusts your schedule when change orders are approved. For example, if a client signs off on a change order that extends a project by two weeks, Smart Calendar will shift the schedule, push back future jobs, and even remind you to notify affected clients, eliminating conflicts before they happen.

To access Smart Calendar, click the Smart Calendar option in the Menu. The calendar will open to the current month, with today’s date highlighted at the top. You’ll see all scheduled projects for the month. Each project label stretches across the calendar to show the number of working days assigned.
To view or edit a project, click on it. A sidebar will open on the right, showing:
- Start and end dates
- Number of working days
- Project address
From the sidebar, click View Project Budget to check the job's materials and orders, or View Project Folder to open its files.
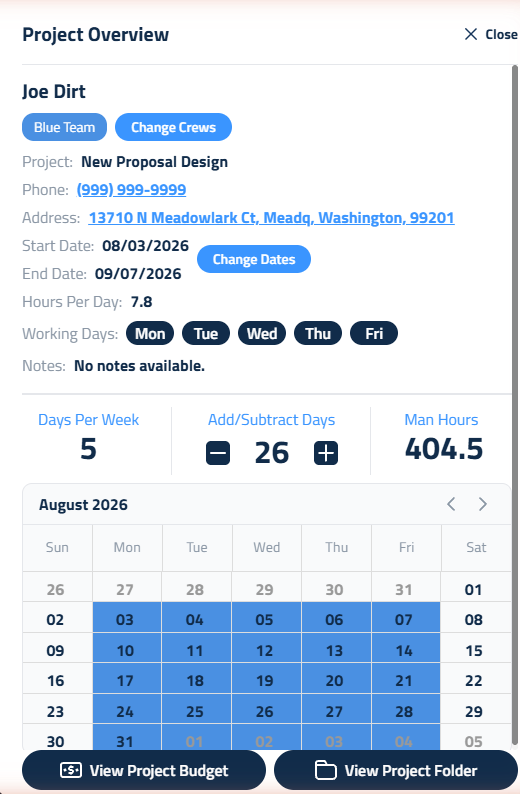
If you need to adjust the schedule, use the plus (+) or minus (–) buttons next to the Working Days field. As you add or subtract days, Smart Calendar will automatically shift other projects assigned to the same crew. These changes won’t affect the project’s Man Hours, only the duration. To reschedule the project, click the Change Dates button and update your timeline on the calendar. When dates are added to the calendar, you will see a box asking you to indicate whether you'd also like to update Invoicing to match the new dates. You can also remove a project from the calendar entirely by clicking Remove From Calendar at the bottom of the sidebar.
Adding Proposals to Smart Calendar

On the right side of the Smart Calendar screen, you’ll see a list of accepted proposals labeled Proposals To Schedule.
To add one to the calendar:
- Click Add Project to Calendar.
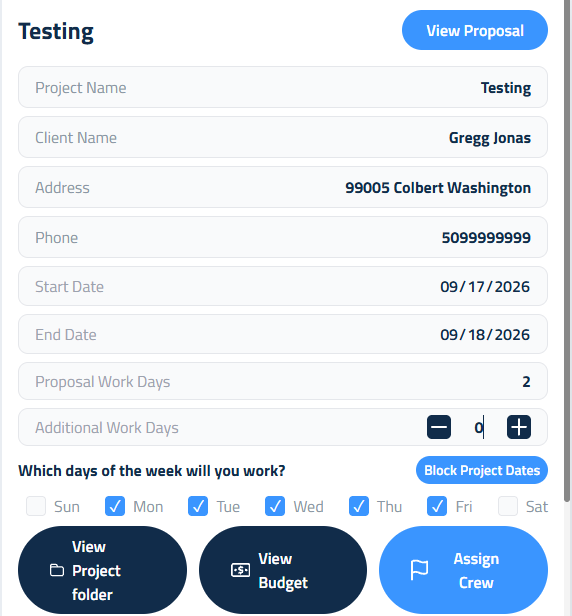
- In the Project Overview, review the project details pulled from the proposal.
- Adjust the number of workdays if needed.
- Use checkboxes to set which days of the week your crews will work.
- Set the start and end dates by clicking on the calendar or typing them in.
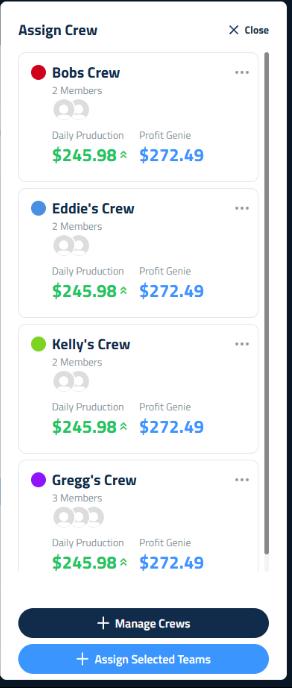
Next, click Assign Crew to open a sidebar with your available crews. You can:
- Select one or more crews to assign
- Click Manage Crews to make changes before assigning
- Remove a crew by clicking the trash icon next to their name
If you assign multiple crews, the color of the first crew will be used on the calendar.
You can also click View Proposal to review the full proposal, View Project Folder to access related files, or View Budget to open the job's Project Budget. As you make changes, the right side of the screen will show a live preview of the project on the calendar. When everything looks right, click Add Project to Calendar in the top right to finalize it.
Subscribing to Your Schedule in Google or Apple Calendar
Your crews and office staff probably already live in Google or Apple Calendar. Instead of asking them to check two places, you can pipe your Elevation schedule straight into the calendar they already use.
Click Add to Google/Apple Calendar at the top of the Smart Calendar screen. A window opens with everything you need.
Step 1: Get your feed link
If nobody has set one up yet, an admin clicks Generate subscription link to create it. If you don't have admin access, you'll see a note asking you to have an admin generate the link.
Once the link exists, it appears in the Feed link box with a Copy button next to it. Copy it.
Step 2: Paste it into your calendar app
- Google Calendar: Other calendars → + → From URL → paste the link → Add calendar
- Apple Calendar: File → New Calendar Subscription → paste the link → Subscribe
That's it. Your schedule shows up as its own calendar layer.
Step 3: Rename it (optional)
The calendar comes across named after your business, for example "Green Valley Landscape Schedule." Google sometimes shows the raw link as the name instead, which is a mouthful in a sidebar. Either way, you can rename it to whatever your team will recognize, like Elevation Advisor.
In Google Calendar (desktop web, at calendar.google.com):
- In the left sidebar, find the calendar under Other calendars.
- Hover over it and click the three dots, then choose Settings.
- Change the Name field to Elevation Advisor.
- Click the back arrow. The change saves on its own.
In Apple Calendar (on a Mac):
- In the sidebar, find the calendar under Subscriptions.
- Control-click it and choose Get Info.
- Change the Name field to Elevation Advisor.
- Click OK.
Renaming is just a label on your end. It doesn't change anything in Elevation Advisor, it doesn't affect anyone else's subscription, and it sticks even after the calendar refreshes.
What Shows Up on the Subscribed Calendar
Each scheduled job comes across as an event running the full length of the project. Every event carries:
- Title: the client's name
- Location: the full job site address, so a tap gives your crew turn-by-turn directions
- Details: the project name, the crew assigned, the client's phone number, and the job notes
Keeping It in Sync
The feed stays in sync on its own. Change a project's dates in Smart Calendar, approve a change order that pushes a job out two weeks, or reassign a crew, and the subscribed calendar picks it up without anyone re-adding anything.
Sharing the Link Safely
⚠️ Anyone who has this link can view your entire schedule, including client names, phone numbers, and job site addresses. No login is required. Share it with your team only, and don't post it anywhere public.If the link ever gets out, an admin can open the same window and click Regenerate link. That creates a fresh link and cuts off the old one immediately. Everyone still using the old link loses the calendar, so plan to send out the new link right after you regenerate.
Updated on: 09/17/2026
Thank you!