Irrigation
If this is your first time working in landscape sections, we recommend reviewing the Beds article first. It walks through the basics and uses the same sample project referenced here.
In the Elevation Advisor Sample Design, irrigation is needed in the blue-outlined area.
Adding the Irrigation Section
If you haven’t already added an irrigation section:
- Click Edit in the top right corner.
- Select Irrigation under the template library.
- Click Save to add it to the bottom of the Included Sections list.
Adding Materials
- Expand the Irrigation section using the dropdown arrow.
- Click Add Materials to begin adding items.
Most companies will select the Irrigation/Plumbing category.
- All your items will be listed here.
- You can refine the list using subcategories and groups if you’ve set those up in your Materials Catalog.
As you select items, you’ll be prompted to:
- Enter the quantity
- Assign the item to one of the following groups:
- Pipe
- Head/Nozzle
- Drip System
- Manifold
- Fittings
- Clock/Modules/Wire
- Misc
Once all items are added, click Save.
If you didn’t enter a quantity, click the blue Edit button next to the item to add one. If you didn’t assign an item to a group, you can drag and drop it into the correct group.
These groupings are not visible to the customer, they’re just for internal organization, especially helpful in complex sections like irrigation.
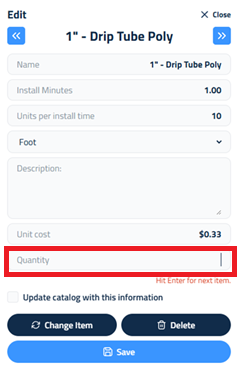
To quickly enter quantities:
- Click the zero value next to the first item.
- Enter the quantity and press Enter to jump to the next item.
- Repeat for the remaining items.
Finalizing the Section
Once materials are in place, you can:
- Change Crew Size, Add labor, equipment, or subcontractors
- Enter a Description of Services to explain the scope of work
- Add Crew Notes for internal communication
If you need help with these steps, refer to the Beds article, which walks through the process in detail.
Updated on: 11/06/2025
Thank you!